The last time I wrote about modifications that John had done to my design or operation they were for power, overheating prevention and fuel economy; this entry will focus on the mods that were required for towing their new 5th wheel trailer.
First and foremost is the 5th wheel hitch which is mounted in my box. This hitch actually consists of three major componients: frame adaptors, bed rails and 5th wheel hitch assembly. The frame adaptors are heavy pieces of steel that bolt against the frame under the box to provide direct mounting points for the bed rails without the need to drill into the frame. The bed rails must be bolted to something solid (the frame) versus the floor of the box which is just thin stamped sheet metal. Eight bolts hold the bed rails through the box floor to the frame adaptors. The hitch assembly is then held in place by four large clevis pins to the bed rails.
Once the 5th wheel hitch was installed John added a
Bed Saver. This safety device is bolted directly to the rear of the 5th wheel hitch and is designed to catch the trailers' kingpin if it were ever to disconnect from the hitch. Now you might ask how can such a large heavy duty hitch and pin fail or disconnect? Well the most common way is the kingpin is not captured properly by the jaws or bar of the hitch. So when the driver begins to pull the trailer forward without completing a "pull test" the trailer simply slides backwards landing on the pickup box rails. When this happens the rails are crushed as well as the front of the trailer; amounting to thousands of dollars in damage. There are great discussions regarding the need of a Bed Saver such as; you are either happy with the extra security or you think it's a waste of money if you follow proper hitching procedures. John wanted the extra security and safety but he also follows all the procedures to properly hitch the 5th wheel trail.
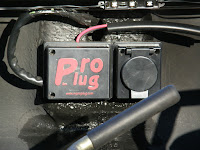
Next required item was an electrical hookup for the trailer in the box. The trailer connection that was installed from the factory as part of my trailer towing package is located in the rear bumper and is not ideal for 5th wheel trailer connections. After some research John found that there is a factory 5th wheel harness that is plugged in between the truck harness in the bumper and the outlet. John was able to find this harness on Craigslist from someone who purchased it and no longer needed it saving a lot of money. Once plugged in and routed up inside to the left side of the box, John wired it into a connection called the
ProPlug. The advantages in using this type of plug versus a standard 7-way plug are the connection is flat and does not require drilling a large hole in the box for mounting (essentiualy it is a surface mount connection). Second the Pro Plug uses LEDs (located under ProPlug cover) to confirm proper wiring and connection or helps in troubleshooting.
The last required item for towing the 5th wheel trailer was repairing my existing towing mirrors. My left mirror worked fine with the exception it would not extend out for wider loads. The right side mirror was completely dead; no power adjustment, heat, turn signal repeater or powr extention. After several attempts to get the power extention to work on my left side mirror John decided that it was best to just replace both mirrors with late model GM towing mirrors which are larger and have the same features as stock.
John was able to find an OEM version of the current tow mirrors (2006-2010) from a online parts store (
http://www.am-autoparts.com/) that sold them in pairs for a discount. Installation was straight forward as in removing the inner door panels, disconnecting the electrical harness for window/mirror controls and removing the three nuts that hold the mirror on. Then reversing the process for the new mirrors. Now I have larger mirrors combinded with a convex (wide angle) mirror to really aid my John or Rana while towing or backing the 5th wheel.


